顯示具有 備份 標籤的文章。 顯示所有文章

2011年4月2日 星期六

Bacula - 遠端主機備份

Linux Client
OS:CentOS 5.3

1. 安裝編譯用套件
yum  install  gcc  gcc-c++

2. 下載原始碼編譯安裝
wget  https://sourceforge.net/projects/bacula/files/bacula/5.0.3/bacula-5.0.3.tar.gz/download
tar  -zxvf  bacula-5.0.3.tar.gz
cd  bacula-5.0.3
CFLAGS="-g -O2 -Wall" \
   ./configure \
   --enable-client-only \
   --sbindir=/usr/local/bacula/bin \
   --sysconfdir=/usr/local/bacula/bin \
   --with-pid-dir=/usr/local/bacula/bin/working \
   --with-subsys-dir=/usr/local/bacula/bin/working \
   --enable-smartalloc \
   --with-working-dir=/usr/local/bacula/bin/working \
   --with-dump-email=your@address.com \
   --with-job-email=your@address.com \
   --with-smtp-host=localhost
make
make install

3. 修改Client的Bacula File Confiugration
cd  /usr/local/bacula/bin
vi  bacula-fd.conf
# List Directors who are permitted to contact this File daemon
Director {
  Name = bacula-dir (對應bacula director name)
  Password = linuxtest (自訂密碼)
}

4. 啟用bacula file deamon
/usr/local/bacula/bin/bacula-fd

Bacula  Server
1. 使用Webmin建立遠端Bacula Client
https://Bacula server IP:10000
1-1 建立Bacula File Client
Director Configuration -> Backup Clients -> Add a new backup client
Bacula FD password需和Client端輸入的要相同


1-2 測試Client是否驗證成功
Backup and Restore Actions -> Client Status


Windows Client
1. 下載安裝Bacula程式
Installation Type選擇Automatic


輸入相關參數
DIR Name:bacula director name
DIR Password:自訂密碼
DIR Address:bacula director IP


2. 驗證Windows Bacula File configuration
開始 -> 所有程式集 -> Bacula -> Configuration -> Edit Client Configuration
# List Directors who are permitted to contact this File daemon
Director {
  Name = bacula-dir (對應bacula director name)
  Password = "windowstest" (自訂密碼)
}

3. 啟動bacula file deamon
開始 -> 所有程式集 -> Bacula -> Start File Service

Bacula Server
1. 使用Webmin建立遠端Bacula Client
https://Bacula server IP:10000
1-1 建立Bacula File Client
Director Configuration -> Backup Clients -> Add a new backup client


1-2 測試Client是否驗證成功
Backup and Restore Actions -> Client Status


Bacula - 圖形介面操作(二)

使用Webacula操作備份還原

OS:Fedora13
Requirement:
Bacula
MySQL
php-ZendFramework  php-ZendFramework-Feed  php-gd  php-xml
Apache
webacula

承接模組化的備份機制 - bacula一文
1. 建立Webacula使用之資料庫
mysql  -u  root  -p
mysql> create  database  webacula;
mysql> grant  all  on  webacula.*  to  wbuser@localhost  identified  by  'wbpass';
mysql> flush  privileges;
mysql> quit


2. 安裝相依套件
yum  install  httpd  php-ZendFramework  php-ZendFramework-Feed  php-gd  php-xml
yum  install  webacula


3. 配置Webacula執行參數
usermod  -aG  bacula  apache
vi  /etc/webacula/config.ini
 db.adapter = PDO_MYSQL
 db.config.host = localhost
 db.config.username = bacula資料庫擁有者的帳號
 db.config.password = bacula資料庫擁有者的密碼
 db.config.dbname = bacula使用之資料庫
 ...
 def.timezone = "Asia/Taipei"
 ...
 bacula.sudo = "/usr/bin/sudo"
 bacula.bconsole = "/usr/sbin/bconsole"
 bacula.bconsolecmd = "-n -c /etc/bacula/bconsole.conf"
 ...
 db.adapter = PDO_MYSQL
 db.config.host = localhost
 db.config.username = webacula資料庫擁有者的帳號
 db.config.password = "webacula資料庫擁有者的密碼"
 db.config.dbname = webacula使用之資料庫

4. 修改bconsole背景執行權限
visudo
#Defaults    requiretty
apache ALL=NOPASSWD: /usr/sbin/bconsole


5. 修改PHP參數
vi  /etc/php.ini
  memory_limit = 128M
  max_execution_time = 600
/etc/init.d/httpd  restart

6. 建立Webacula資料庫基本內容
cd  /usr/share/webacula/install
./webacula_mysql_make_tables.sh  mysql  -u  root  -p

7. 配置Webacula網站存取權限
vi  /etc/httpd/conf.d/webacula.conf
   Deny from all
   Allow from 192.168.1.0/24
   Allow from localhost
   Allow from ::1
   ...
   AuthType Basic
   AuthName "Webacula"
   AuthUserFile       /etc/httpd/conf/webacula.users
   Require valid-user
/etc/init.d/httpd  restart
htpasswd  -c  /etc/httpd/conf/webacula.users  user

8. 完成,測試
http://your webacula host IP/webacula


參考文章:
http://webacula.sourceforge.net/

2011年3月30日 星期三

Bacula - 圖形介面操作(一)

使用Webmin操作備份還原

1. 下載安裝Webmin
wget  http://prdownloads.sourceforge.net/webadmin/webmin-1.530-1.noarch.rpm
rpm  -ivh  webmin-1.530-1.noarch.rpm

2. 使用Webmin操作Bacula作業
https://your Webmin server IP:10000/
2-1 設定Webmin使用的Bacula Module
System -> Bacula Backup System -> module configuration


2-2 建立備份使用的Volume
Backup and Restore Actions -> Label Volume


2-3 執行備份作業
Backup and Restore Actions -> Run Backup Job


2-4 執行還原作業
Backup and Restore Actions -> Restore Backup
(如果組態中有建立多個Restore Job,請只留一個(留預設的即可),不然Webmin執行restore會失敗)


Bacula - 文字介面操作

承接模組化的備份機制 - bacula一文

CLI Backup
1. 建立備份用Job
vi  /etc/bacula/bacula-dir.conf
Job  {
   Name  =  "testbackup"
   Type  =  Backup
   Level  =  Incremental
   Client  =  bacula-fd
   FileSet  =  "testfile"
   Schedule  =  "WeeklyCycle"
   Storage  =  File
   Messages  =  Standard
   Pool  =  Default
}

2. 定義要備份的來源路徑
vi  /etc/bacula/bacula-dir.conf
FileSet  {
   Name  =  "testfile"
   Include  {
      Options  {
        signature  =  MD5
      }
      File  =  /etc
   }
}
/etc/init.d/bacula-dir  restart

3. 使用CLI執行備份
bconsole
3-1 建立備份使用的Volume
*label
3-2 輸入自訂名稱
Enter new Volume name:testVolum
3-3 選擇供哪一Pool使用
Defined Pools:
     1: Default
     2: File
     3: Scratch
Select the Pool (1-3): 1
3-4 執行備份指令
*run
3-5 選擇執行哪一個Job
The defined Job resources are:
     1: testbackup
     2: BackupClient1
     3: BackupCatalog
     4: RestoreFiles
Select Job resource (1-4): 1
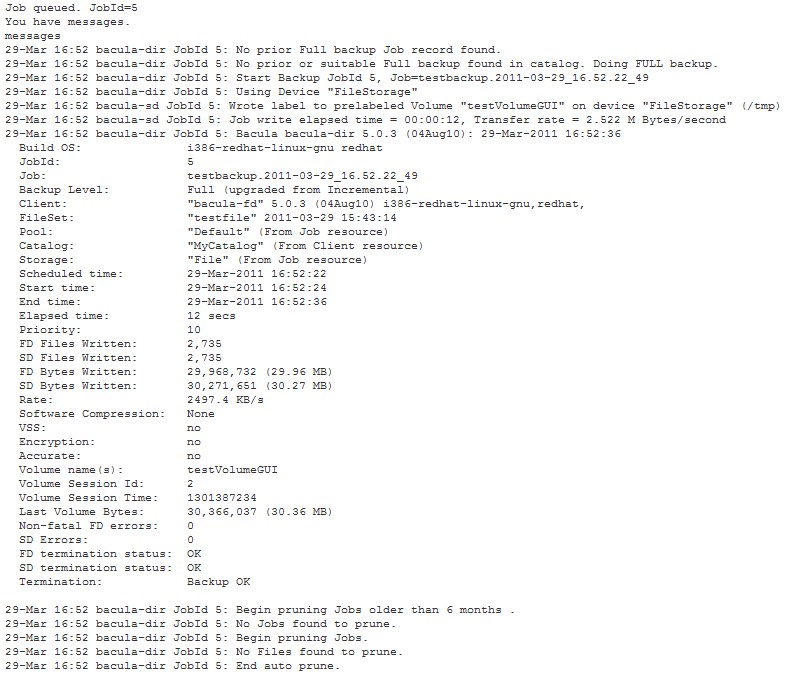
3-6 執行成功畫面


CLI Restore
1. 建立還原Job(Optional)
vi  /etc/bacula/bacula-dir.conf (建議只要一個Restore Job即可)
Job  {
   Name  =  "testrestore"
   Type  =  Restore
   Client  =  bacula-fd
   FileSet  =  "testfile"
   Storage  =  File
   Pool  =  Default
   Messages  =  Standard
   Where  =  /tmp/bacula-restores
}
/etc/init.d/bacula-dir  restart

2. 使用CLI執行還原
bconsole
*restore
2-1 選擇使用何種方式執行還原
To select the JobIds, you have the following choices:
     1: List last 20 Jobs run
     2: List Jobs where a given File is saved
     3: Enter list of comma separated JobIds to select
     4: Enter SQL list command
     5: Select the most recent backup for a client
     6: Select backup for a client before a specified time
     7: Enter a list of files to restore
     8: Enter a list of files to restore before a specified time
     9: Find the JobIds of the most recent backup for a client
    10: Find the JobIds for a backup for a client before a specified time
    11: Enter a list of directories to restore for found JobIds
    12: Select full restore to a specified Job date
    13: Cancel
Select item:  (1-13): 11
2-2 輸入某一時間點備份成功的Job Id
Enter JobId(s), comma separated, to restore: 1
2-3 輸入欲還原檔案在備份路徑下的絕對位置
可輸入多組路徑,如欲結束直接按Enter即可
Enter directory name: /etc
Enter directory name:
2-3 選擇使用哪一個Restore Job
The defined Restore Job resources are:
     1: testrestore
     2: RestoreFiles
Select Restore Job (1-2): 1
2-4 還原成功的畫面


參考文章:
http://ssorc.tw/rewrite.php/read-169.html

2011年3月29日 星期二

模組化的備份機制 - bacula

OS:Fedora 13

Requirement:
mysql  mysql-server
bacula-director-common  bacula-director-mysql
bacula-client
bacula-storage-common  bacula-storage-mysql
bacula-common  bacula-console  bacula-docs  bacula-traymonitor

1. 安裝mysql
yum  install  mysql  mysql-server
service  mysqld  start
mysqladmin  -u  root  password  '管理者密碼'
chkconfig  mysqld  on

2. 安裝bacula相關套件
yum  install  bacula-director-common  bacula-director-mysql
yum  install  bacula-client
yum  install  bacula-storage-common  bacula-storage-mysql
yum  install  bacula-common  bacula-console  bacula-docs

3. 建立bacula使用之資料庫
cd  /usr/libexec/bacula
./create_mysql_database mysql -u root -p
./make_mysql_tables mysql -u root -p

4. 設定bacula資料庫使用權限
mysql  -u  root  -p
grant  all  on  bacula.*  to  bacula@localhost  identified  by  'bacula';
flush  privileges;

5. 設定bacula-dir的組態檔
vi  /etc/bacula/bacula-dir.conf
...
Director  {
Password  =  "bacula-dir的密碼"
}
...
Client {
  Address =  Bacula Server IP
  Password = "baucla-fd的密碼"
}
...
Storage {
  Address = Bacula Server IP
  Password = "bacula-sd的密碼"
}
...
Catalog {
  dbname = "bacula"; dbuser = "bacula"; dbpassword = "bacula"
}
...
Console {
  Password = "tray-monitor使用的密碼"
}

6. 設定bacula-fd的組態檔
vi  /etc/bacula/bacula-fd.conf
...
Director {
  Password = "對應dir組態中Client的密碼"
}
...
Director {
  Password = "對應dir組態中Console的密碼"
}

7. 設定bacula-sd的組態檔
vi  /etc/bacula/bacula-sd.conf
...
Director {
  Password = "對應dir組態中Storage的密碼"
}
...
Director {
  Password = "對應dir組態中Console的密碼"
}
...
Device {
  Archive Device = 指定備份儲存的目錄
}

8. 設定bconsole的組態檔
vi  /etc/bacula/bconsole.conf
Director {
  address = Bacula Server IP
  Password = "對應dir組態中Console的密碼"
}

9. 啟動bacula服務
service  bacula-dir  start
chkconfig  bacula-dir  on
service  bacula-fd  start
chkconfig  bacula-fd  on
service  bacula-sd  start
chkconfig  bacula-sd  on

10. 檢查服務是否正常啟動
netstat  -tnulp


參考文章:
http://www.bacula.org/en/
http://yuhfa.blogspot.com/2008/12/bacula.html