2011年3月30日 星期三

Bacula - 圖形介面操作(一)

使用Webmin操作備份還原

1. 下載安裝Webmin
wget  http://prdownloads.sourceforge.net/webadmin/webmin-1.530-1.noarch.rpm
rpm  -ivh  webmin-1.530-1.noarch.rpm

2. 使用Webmin操作Bacula作業
https://your Webmin server IP:10000/
2-1 設定Webmin使用的Bacula Module
System -> Bacula Backup System -> module configuration


2-2 建立備份使用的Volume
Backup and Restore Actions -> Label Volume


2-3 執行備份作業
Backup and Restore Actions -> Run Backup Job


2-4 執行還原作業
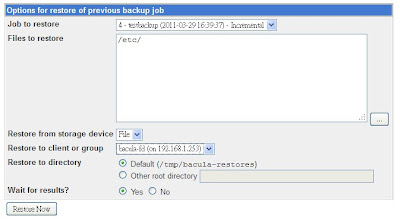
Backup and Restore Actions -> Restore Backup
(如果組態中有建立多個Restore Job,請只留一個(留預設的即可),不然Webmin執行restore會失敗)


Bacula - 文字介面操作

承接模組化的備份機制 - bacula一文

CLI Backup
1. 建立備份用Job
vi  /etc/bacula/bacula-dir.conf
Job  {
   Name  =  "testbackup"
   Type  =  Backup
   Level  =  Incremental
   Client  =  bacula-fd
   FileSet  =  "testfile"
   Schedule  =  "WeeklyCycle"
   Storage  =  File
   Messages  =  Standard
   Pool  =  Default
}

2. 定義要備份的來源路徑
vi  /etc/bacula/bacula-dir.conf
FileSet  {
   Name  =  "testfile"
   Include  {
      Options  {
        signature  =  MD5
      }
      File  =  /etc
   }
}
/etc/init.d/bacula-dir  restart

3. 使用CLI執行備份
bconsole
3-1 建立備份使用的Volume
*label
3-2 輸入自訂名稱
Enter new Volume name:testVolum
3-3 選擇供哪一Pool使用
Defined Pools:
     1: Default
     2: File
     3: Scratch
Select the Pool (1-3): 1
3-4 執行備份指令
*run
3-5 選擇執行哪一個Job
The defined Job resources are:
     1: testbackup
     2: BackupClient1
     3: BackupCatalog
     4: RestoreFiles
Select Job resource (1-4): 1
3-6 執行成功畫面


CLI Restore
1. 建立還原Job(Optional)
vi  /etc/bacula/bacula-dir.conf (建議只要一個Restore Job即可)
Job  {
   Name  =  "testrestore"
   Type  =  Restore
   Client  =  bacula-fd
   FileSet  =  "testfile"
   Storage  =  File
   Pool  =  Default
   Messages  =  Standard
   Where  =  /tmp/bacula-restores
}
/etc/init.d/bacula-dir  restart

2. 使用CLI執行還原
bconsole
*restore
2-1 選擇使用何種方式執行還原
To select the JobIds, you have the following choices:
     1: List last 20 Jobs run
     2: List Jobs where a given File is saved
     3: Enter list of comma separated JobIds to select
     4: Enter SQL list command
     5: Select the most recent backup for a client
     6: Select backup for a client before a specified time
     7: Enter a list of files to restore
     8: Enter a list of files to restore before a specified time
     9: Find the JobIds of the most recent backup for a client
    10: Find the JobIds for a backup for a client before a specified time
    11: Enter a list of directories to restore for found JobIds
    12: Select full restore to a specified Job date
    13: Cancel
Select item:  (1-13): 11
2-2 輸入某一時間點備份成功的Job Id
Enter JobId(s), comma separated, to restore: 1
2-3 輸入欲還原檔案在備份路徑下的絕對位置
可輸入多組路徑,如欲結束直接按Enter即可
Enter directory name: /etc
Enter directory name:
2-3 選擇使用哪一個Restore Job
The defined Restore Job resources are:
     1: testrestore
     2: RestoreFiles
Select Restore Job (1-2): 1
2-4 還原成功的畫面


參考文章:
http://ssorc.tw/rewrite.php/read-169.html

2011年3月29日 星期二

模組化的備份機制 - bacula

OS:Fedora 13

Requirement:
mysql  mysql-server
bacula-director-common  bacula-director-mysql
bacula-client
bacula-storage-common  bacula-storage-mysql
bacula-common  bacula-console  bacula-docs  bacula-traymonitor

1. 安裝mysql
yum  install  mysql  mysql-server
service  mysqld  start
mysqladmin  -u  root  password  '管理者密碼'
chkconfig  mysqld  on

2. 安裝bacula相關套件
yum  install  bacula-director-common  bacula-director-mysql
yum  install  bacula-client
yum  install  bacula-storage-common  bacula-storage-mysql
yum  install  bacula-common  bacula-console  bacula-docs

3. 建立bacula使用之資料庫
cd  /usr/libexec/bacula
./create_mysql_database mysql -u root -p
./make_mysql_tables mysql -u root -p

4. 設定bacula資料庫使用權限
mysql  -u  root  -p
grant  all  on  bacula.*  to  bacula@localhost  identified  by  'bacula';
flush  privileges;

5. 設定bacula-dir的組態檔
vi  /etc/bacula/bacula-dir.conf
...
Director  {
Password  =  "bacula-dir的密碼"
}
...
Client {
  Address =  Bacula Server IP
  Password = "baucla-fd的密碼"
}
...
Storage {
  Address = Bacula Server IP
  Password = "bacula-sd的密碼"
}
...
Catalog {
  dbname = "bacula"; dbuser = "bacula"; dbpassword = "bacula"
}
...
Console {
  Password = "tray-monitor使用的密碼"
}

6. 設定bacula-fd的組態檔
vi  /etc/bacula/bacula-fd.conf
...
Director {
  Password = "對應dir組態中Client的密碼"
}
...
Director {
  Password = "對應dir組態中Console的密碼"
}

7. 設定bacula-sd的組態檔
vi  /etc/bacula/bacula-sd.conf
...
Director {
  Password = "對應dir組態中Storage的密碼"
}
...
Director {
  Password = "對應dir組態中Console的密碼"
}
...
Device {
  Archive Device = 指定備份儲存的目錄
}

8. 設定bconsole的組態檔
vi  /etc/bacula/bconsole.conf
Director {
  address = Bacula Server IP
  Password = "對應dir組態中Console的密碼"
}

9. 啟動bacula服務
service  bacula-dir  start
chkconfig  bacula-dir  on
service  bacula-fd  start
chkconfig  bacula-fd  on
service  bacula-sd  start
chkconfig  bacula-sd  on

10. 檢查服務是否正常啟動
netstat  -tnulp


參考文章:
http://www.bacula.org/en/
http://yuhfa.blogspot.com/2008/12/bacula.html

線上學習系統 - Moodle

Moodle目前最新穩定版為2.0.2
但此版本持續每禮拜更新,
所以下載檔案也面會出現2.0.2+的版本
Moodle 2.0.2+
依2.0.2版本持續更新(weekly)
Moodle 2.0.2
最新穩定版(2011/2/21)

OS:CentOS 5.3
Requirements:
PHP 5.2(php、php-devel、php-mysql、php-mbstring、php-dom、php-xmlrpc、php-soap、php-gd)
Apache
Mysql

1. 更新套件庫(PHP5.2),安裝相依套件
vi  /etc/yum.repos.d/CentOS-Testing.repo
  [c5-testing]
  name=CentOS-5 Testing
  baseurl=http://dev.centos.org/centos/$releasever/testing/$basearch/
  enabled=1
  gpgcheck=1
  gpgkey=http://dev.centos.org/centos/RPM-GPG-KEY-CentOS-testing
yum  install  httpd  mysql  mysql-server
yum  install  php  php-devel  php-mysql  php-mbstring  php-dom  php-xmlrpc  php-soap  php-gd
/etc/init.d/httpd  restart
chkconfig  httpd  on
/etc/init.d/mysqld  restart
chkconfig  mysqld  on

2. 建立Moodle使用的資料庫
mysqladmin  -u  root  password  '管理者密碼'
mysql  -u  root  -p
mysql> create  database  moodle;
mysql> grant  all  on  moodle.*  to  moodle@localhost  identified  by  'moodle';
mysql> flush  privileges;
mysql> use  moodle
mysql> ALTER  DATABASE  moodle  DEFAULT  CHARACTER  SET  utf8  COLLATE  utf8_unicode_ci;

3. 安裝Moodle 2.0.2
wget  http://download.moodle.org/download.php/stable20/moodle-2.0.2.tgz
mkdir  /var/www/html/moodle
mv  moodle-2.0.2.tgz  /var/www/html/
cd  /var/www/html/
tar  -zxvf  moodle-2.0.2.tgz
chown  -R  apache  /var/www/html/moodle/
mkdir  /var/www/moodledate
chown  -R  apache  /var/www/moodledate

4. 配置Moodle
http://your Moodle server IP/moodle
4-1 配置語言


4-2 配置安裝路徑


4-3 選擇資料庫類型


4-4 配置資料庫參數


4-5 授權合約說明


4-6 Server環境偵測,如出現錯誤請更正


4-7 安裝相關模組


4-8 網站相關參數設定


4-9 網站說明


4-10 完成


參考文章:
http://moodle.org/
http://download.moodle.org/

成功語錄(1)

一:沉穩

(1)不要隨便顯露你的情緒。

(2)不要逢人就訴說你的困難和遭遇。


(3)在徵詢別人的意見之前,自己先思考,但不要先講。

(4)不要一有機會就嘮叨你的不滿。

(5)重要的決定儘量有別人商量,最好隔一天再發佈。

(6)講話不要有任何的慌張,走路也是。

 二:細心

(1)對身邊發生的事情,常思考它們的因果關係。

(2)對做不到位的執行問題,要發掘它們的根本癥結。

(3)對習以為常的做事方法,要有改進或優化的建議。

(4)做什麼事情都要養成有條不紊和井然有序的習慣。

(5)經常去找幾個別人看不出來的毛病或弊端。

(6)自己要隨時隨地對有所不足的地方補位。

 三:膽識

(1)不要常用缺乏自信的詞句

(2)不要常常反悔,輕易推翻已經決定的事。

(3)在眾人爭執不休時,不要沒有主見。

(4)整體氛圍低落時,你要樂觀、陽光!

(5)做任何事情都要用心,因為有人在看著你。

(6)事情不順的時候,歇口氣,重新尋找突破口,就結束也要乾淨俐落。

 四:大度

(1)不要刻意把有可能是夥伴的人變成對手。

(2)對別人的小過失、小錯誤不要斤斤計較。

(3)在金錢上要大方,學習三施(財施、法施、無畏施)

(4)不要有權力的傲慢和知識的偏見。

(5)任何成果和成就都應和別人分享。

(6)必須有人犧牲或奉獻的時候,自己走在前面。

 五:誠信

(1)做不到的事情不要說,說了就努力做到。

(2)虛的口號或標語不要常掛嘴上。

(3)針對客戶提出的"不誠信"問題,拿出改善的方法。

(4)停止一切"不道德"的手段。

(5)耍弄小聰明,要不得!

(6)計算一下產品或服務的誠信代價,那就是品牌成本。

 六:擔當

(1)檢討任何過失的時候,先從自身或自己人開始反省。

(2)事項結束後,先審查過錯,再列述功勞。

(3)認錯從上級開始,表功從下級啟動。

(4)著手一個計畫,先將權責界定清楚,而且分配得當。

想 和聰明的人在一起,你就得聰明;想和優秀的人在一起,你就得優秀。
善於發現別人的優點,並把它轉化成自己的長處,你 就會成為聰明人;

學最好的別人,做最好的自己。

2011年3月10日 星期四

會計系統 - OpenERP

企業ERP新選擇OpenERP(TinyERP)
使用Python程式語言撰寫,結合Postgresql資料庫,
在此使用與官網相同的Ubuntu 10.04建置,
以下是建置的過程以及相異於Document的步驟紀錄。

OS:Ubuntu 10.04

Requirments:
postgresql
python  python-lxml  python-mako  python-egenix-mxdatetime
python-lxml  python-mako  python-egenix-mxdatetime
python-pydot  python-tz  python-reportlab
python-yaml  python-vobject  python-setuptools
python-dev  build-essential  python-beaker
openerp-server  openerp-web

1.  設定網路參數
sudo  vi  /etc/network/interfaces
auto  eth1
iface  eth1  inet  static
address  192.168.44.10
netmask  255.255.255.0
gateway  192.168.44.2

sudo  vi  /etc/resolv.conf
nameserver  192.168.44.2
nameserver  168.95.1.1

sudo  /etc/init.d/networking  restart

2.  安裝、設定資料庫
sudo  apt-get  install  postgresql
   sudo  su  postgres
   createuser  openerp
   Shall  the  new  role  be  a  superuser?  (y/n)  y
   psql  -l
   psql  template1
   alter  role  openerp  with  password  'postgres';
   psql  \q
exit

3.  建置OpenERP-server
sudo  apt-get  install  python-lxml  python-mako  python-egenix-mxdatetime
sudo  apt-get  install  python-pydot  python-tz  python-reportlab
sudo  apt-get  install  python-yaml  python-vobject  python-setuptools
tar  -zxvf  openerp-server-6.0.1.tar.gz
cd  openerp-server-6.0.1/
sudo  python  setup.py  install

4.  啟動OpenERP Server
openerp-server  &

5.  建置OpenERP web client
sudo  apt-get  install  python-dev  build-essential  python-beaker
tar  -zxvf  openerp-web-6.0.1.tar.gz
cd  openerp-web-6.0.1/
sudo  python  setup.py  install

6.  啟動OpenERP Web
openerp-web &

7.  測試
使用瀏覽器連線OpenERP-web
http://openerp server IP:8080


備註:
openerp-server組態檔
Default   /usr/local/share/doc/openerp-server-6.0.1/openerp-server.conf
opnerp-server啟動時會在啟動openerp-server的使用者家目錄底下複製Default configure生成.openerp_serverrc讓程式參照
~/.openerp_serverrc

openerp-web組態檔
/usr/local/lib/python2.6/dist-packages/openerp_web-6.0.1-py2.6.egg/doc/openerp-web.cfg

參考文章:
http://www.openerp.com/
http://zh.wikipedia.org/zh-tw/OpenERP